Instructions for Ultrasonic Testing
Instructions for ultrasonic testing of gold bullion and silver bars
1. Getting Started
1.1 Insert 4 AAA batteries in the battery compartment.
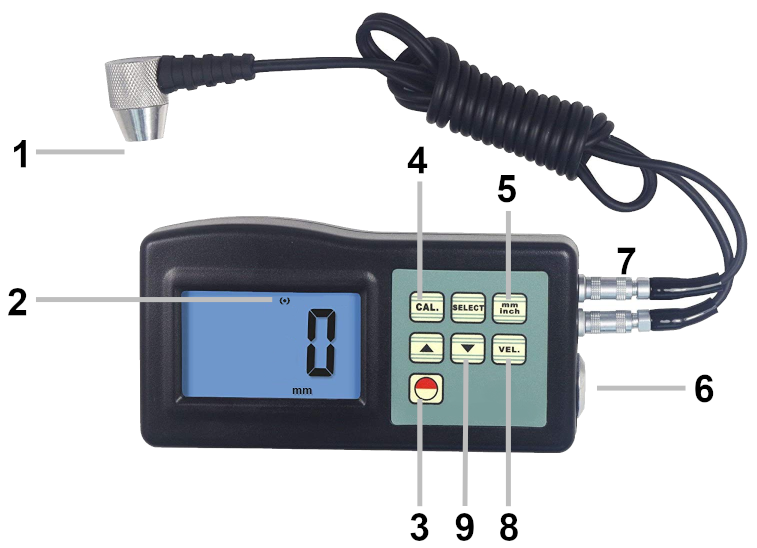
1.2 Plug the sensor cable into the two sensor jacks (7).
1.3 Press the power key (3) to turn the unit on.

1. Ultrasonic sensor
2. Coupling indicator
3. Power key
4. Calibration key
5. mm/inch key
6. Calibration block
7. Sensor jacks
8. Velocity key
9. Plus / Minus keys
Velocities of Precious Metals
Gold – 3240 m/s
Silver – 3650 m/s
2. Calibration
2.1 Drop a small amount of coupling gel on the 5 mm standard calibration block (6).
2.2 Press the calibration key (4). `CAL` will be shown on the display.
2.3 Gently press the ultrasonic sensor (1) on the calibration block (6). The coupling indicator (2) will be displayed when the sensor is coupling well. 5.0 mm (or 0.197 inch) and CAL will flash on the display in turn. When consistent, press the calibration key (4) to confirm the calibration. The unit is now ready to measure.
2.4 The calibration will be auto-saved to the unit once confirmed. It is not necessary to calibrate often unless the accuracy of any measurement appears doubtful.
3. Measuring by Velocity
3.1 Press the velocity key (8) and the display shows the previous sound velocity setting.
3.2 To measure thickness by known velocity: The velocity is set by pressing the plus key or minus key (9) to input the value of the known sound velocity of the metal being tested. Refer to the table of velocities adjacent. The increment is 10 m/s for each press of the plus or minus key. The increment is raised to 100 m/s when the key is depressed for 4 seconds. By adjusting velocity, the thickness of any precious metal can be measured.
3.3 Once velocity has been set, drop a small amount of coupling gel onto the metal bar being tested and press the sensor (1) onto the surface. When the sensor is coupling well, the reading displays the thickness of the metal. For embossed or irregular surfaces you may need to be patient to get a good coupling. Compare the result with the known thickness of the metal as determined by a ruler, callipers or product specifications. If there is a significant difference between the result and the known thickness, the metal bar should be assessed for adulteration.
3.4 If you have known good bars composed of alloys, you can determine their sound velocities by adjusting the plus and minus keys until the displayed result matches the known thickness of the bar. Record the sound velocity for the alloy and then use it as a standard to test the authenticity of unknown bars of the same alloy.